|
8.8" Rear End w/ Disc Brake Swap
This article covers how to
install an 8.8" trac loc disc brake rear in place of the weak 7.5" drum
brake rear. I would suggest you install tubular control arms while
you are doing the swap. New spring isolators would be a good thing
to change out as well. There is no easier time to do it then right
now.
Parts:
8.8" Rear End
Adjustable Proportioning Valve (Available from Wilwood for ~$40)
3-2 Port Conversion Kit (Available
Here)
Gutted proportioning valve (See Instructions
Here)
E-Brake Cables:
(2) FMS M-2809-A ebrake cables for '87-92 cars, '93 Cobra units for
'93 year cars
(1) FMS M-2810-A center Ebrake cable (Optional?)
4 wheel disc brake master cylinder:
84-86 SVO - 1 1/8" bore, old style aluminum reservoir unit. no low
fluid sensor. Works best with the larger caddy or Lincoln rear calipers
or the front SVO 73mm calipers.
93 Cobra - 1.00" bore Best MC but also expensive.
94-98 V6/GT - 1 1/16" bore, stock plug in for the low fluid sensor. Better
compromise for most everything but the Cobra or Brembo brakes..
94-95 Cobra - 15/16" bore, stock plug in for low fluid sensor. Ports are
reversed thread sizes from V6/GT Best for Cobra or Brembo brakes.
99 V6 - 1.00" bore. Similar to 93 Cobra unit.
Note:
You can get away with using the disc brakes with the stock master cylinder
and proportioning valve. It is far from ideal though and will not
work to it's full potential. If you are using 5.0 front brakes with
SVO 73mm calipers it is even more important.
Note II:
Be aware that the 87-88 Turbo Coupe 8.8" disc brake/93 Cobra rears are
1.5" wider overall than the Fox Body Mustang rears. This will move
your wheels/tires out 3/4" on each side. Most people have no
problems with this. Some aftermarket wheels will drag though.
1.
Jack the rear of the car up
as high as possible and put it on jackstands. Remove the back
wheels.
2.
Remove the both lower shock bolts.
3.
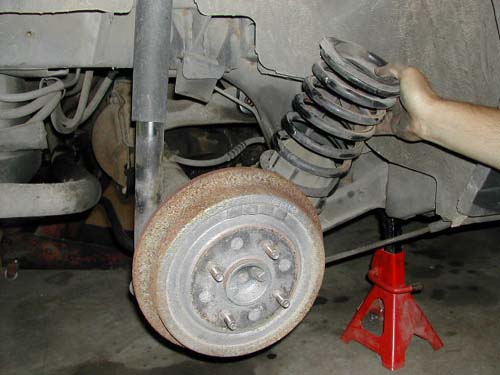
Put a jack under the
driver's side brake drum and jack it up until the passenger side spring
can be removed. You may need to push down on the passenger side a
bit to remove the spring. Once removed, do the same thing for the
other side. Move the jack back to the center of the rear end (or on
both sides for more stability).
4.
Remove the 4 driveshaft bolts. There is no need to remove the
driveshaft from the trans (unless you enjoy making a mess).
5.
Remove the upper control arm
to chassis bolts.
6.
Remove the lower control arm
to chassis bolts.
7.
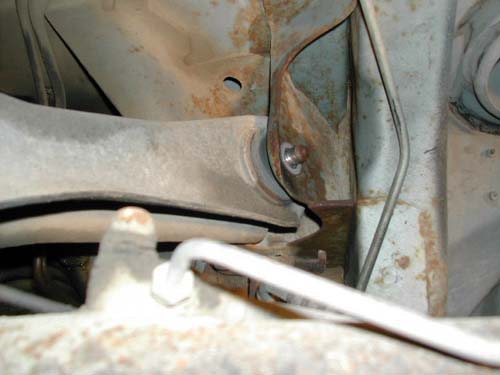
Remove the brake line where
it connects to the distribution block on the rear end. Remove the
e-brake cables from both drum brakes. The brakes will most likely
need to be disassembled to accomplish this.
8.
Lower the rear end and use a
hammer to break the control arms away from the chassis if they are stuck.
9.
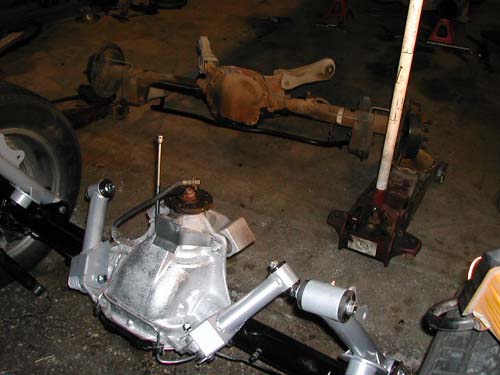
Drag rear end out from under
car and out of the way. If you aren't using tubular control arms then
install the old arms on the 8.8" rear. Grease the sides of the
bushings so they will slide into the chassis mounts. Grab the 8.8"
rear and slide it under the car.
10.
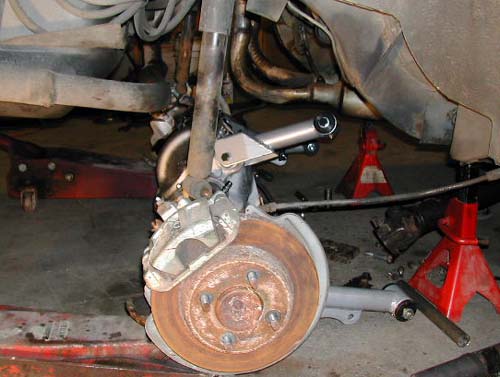
Lift rear end with a jack
under each rotor until you can align the upper control arm with the
chassis mount. Install the upper control arm bolts but don't tighten
down.
11.
Lower rear end and install
the lower control arms. These will most likely be an extremely tight
fit. You will probably need to use a hammer to convince the arms
that they really do want to cooperate. Once aligned install the
bolts.
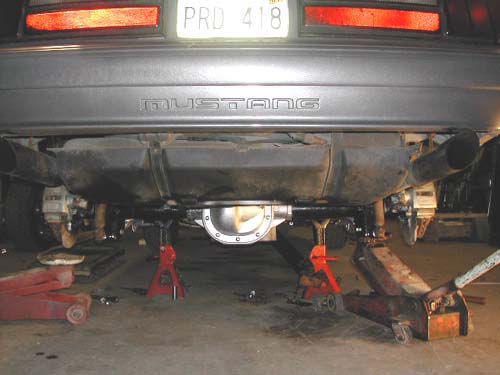
12.
Use the same procedure as
noted in step 3 to install springs. Make sure you have the correct
isolators installed as well. Turn the springs so the "end" of the
spring on the bottom is pointing towards the driver's side. If you
don't do this the car will not sit level once the project is complete.
13.
Raise the rear end to ride height. Install lower shock bolts and
tighten down. Tighten all the upper and lower control arm bolts.
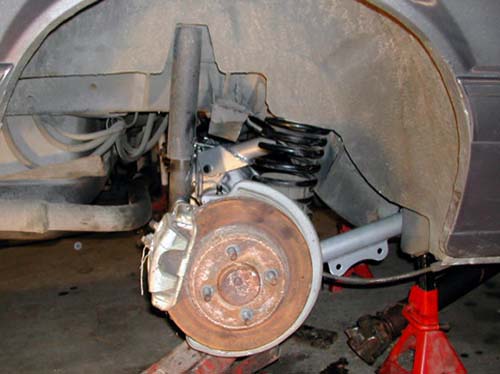
14.
Remove the brake line that goes from the distribution block to the
passenger side drum brake on the 7.5" rear. Screw it onto the rubber
hose that exits the distribution block on the 8.8" rear. Bend it to
line up with the factory brake supply line that was connected to the 7.5"
rear.
15.
Remove brake line "inline" coupler found under the hood on the passenger
side of the firewall and install the adjustable proportioning valve in
this location.
16.
Use the coupler that is removed to install the adjustable proportioning
valve to connect the 7.5" rear's hard line to the factory supply line.
(pics coming soon) Grease the control arm bushings if possible.
Install the ebrake cables. Install tires and lower vehicle if you haven't
already done so.
17.
Install the new master cylinder, 3-2 port conversion kit, and gut the
proportioning valve (see instructions
Here)
18.
Bleed the brake system to remove all the air from the system. Check
to make sure you have good pedal pressure.
19.
Drive vehicle 50-100 miles and re-torque all control arm bolts.
Note III:
I will be providing you with a cheaper alternative to the new e-brake
cables soon. I just need to get the details worked out and take
pictures/do the write-up.
If you have any questions about any of these procedures feel free to
contact me
HERE
©
Stinger Performance Engineering 2016 |


